Stop Costly Resprays: 3 Lab Checks to Fix Gloss Loss in Paint
Stop Costly Resprays: 3 Lab Checks to Fix Gloss Loss in Paint ! Paint gloss diagnostics title card Gloss loss, often called dieback, is the dulling or hazing of a paint film after it appeared to cure normally, and it almost always traces back to solvents still trapped beneath the surface or a curing…
Gloss loss, often called dieback, is the dulling or hazing of a paint film after it appeared to cure normally, and it almost always traces back to solvents still trapped beneath the surface or a curing reaction gone wrong. The immediate action is simple: stop applying additional coats, give the film uninterrupted cure time in stable conditions, and check tack before deciding whether the problem is application error or something deeper in the formulation.
TL;DR:
- Gloss loss is often caused by trapped solvent beneath the cured surface, which can be confirmed by odor, pattern, or soft film tests.
- Applying heavy or improperly timed coats, especially over incompatible primers or fillers, increases the risk of solvent entrapment and dieback.
- Environmental factors like cool, damp conditions or direct UV exposure during curing can trigger reactions that reduce gloss and degrade coating quality.
- Widespread, even gloss loss may require stripping and refinishing, as it usually indicates formulation issues like pigment flocculation or insufficient dispersion stability.
- Formulation fixes, such as dispersant or rheology modifiers, are recommended when gloss failure persists across batches, since application corrections alone cannot resolve upstream chemical problems.
Gloss loss shows up as a hazy, patchy, or milky dulling across a film that looked wet and reflective right after application. It rarely appears in the first hour. Most cases surface anywhere from a few hours to several days later, which is the biggest clue that dieback is at work: solvent trapped under a skinned-over surface keeps evaporating and disturbs the film from below.
A few on-site checks separate true gloss loss from other defects like chalking or surface contamination:
- Raking light test: hold a work light at a low angle across the panel; true dieback shows uneven, cloudy patches rather than uniform matte texture.
- Fingernail or mar test: lightly drag a fingernail across an inconspicuous area; if the film marks easily or feels soft under a hardened top, solvent is still migrating.
- Odor check: a lingering solvent smell days after application points to trapped solvent rather than a formulation defect.
- Pattern check: haze confined to areas with heavier film build usually means application, while haze spread evenly across a batch suggests something happened before the can was opened.
Common Causes During Application and Service
Most gloss loss traced to job-site work falls into three categories, and they usually overlap.
- Trapped solvent and timing errors. Recoating before flash time finishes, or applying a heavy single coat instead of thinner passes, seals solvent beneath a skinned surface. Multiple thin coats consistently outperform one heavy coat for this exact reason, and incompatible primers or fillers that release their own solvents into a fresh topcoat make the problem worse.
- Environmental interference. Cool, damp conditions slow solvent release and can trigger amine blush, a reaction between amine curing agents and airborne carbon dioxide or moisture that leaves a dull, sometimes greasy film. Direct UV exposure during or shortly after cure degrades solvent-based binders faster than UV-resistant acrylic formulations, so the same coating can behave differently depending on season and orientation.
- Surface prep and film-build errors. Sanding scratches left too coarse, inadequate degreasing, or excessive film thickness all roughen the microsurface enough to scatter light and read as reduced gloss, even when the chemistry cured correctly.
Prevention Best Practices for Application and Environment
Most gloss loss is preventable with disciplined scheduling and the right materials on hand, not exotic equipment.
- Respect manufacturer-listed flash and intercoat times exactly; shortening them to save a shift is the single most common cause of dieback.
- Match reducer or thinner grade to ambient temperature and humidity rather than defaulting to whatever is open on the shelf.
- Build film thickness in multiple thin passes instead of one heavy coat, which lets solvent escape as it should instead of getting sealed under a skin.
- Control booth or shop temperature and humidity, and keep ventilation moving during both application and early cure.
- Confirm primer and topcoat compatibility before spraying, especially across different resin chemistries.
- Choose UV-resistant acrylic binders for anything facing direct sun exposure long term.
Pro Tip: Before committing a full panel or batch to a new primer/topcoat combination, spray a small test card and let it cure through a full day/night temperature cycle. Dieback often needs that swing to reveal itself, and a test card costs you minutes instead of a full respray.
Repair Options: When to Wait, Abrade, or Strip
Not every dull patch needs aggressive intervention, and jumping straight to a full strip wastes material and time when the fix is simpler.
- Confirm the film is actually cured before touching it. Run the fingernail and odor checks described earlier; if solvent is still active, wait. Recoating an actively outgassing film only traps more solvent.
- For small, isolated haze, clean the area to remove contamination, then scuff-sand lightly with a fine grit to key the surface before a controlled recoat. This works well when the defect is confined to one panel or a limited area and the underlying film is sound.
- For widespread dulling across a batch or large surface, especially when it shows up evenly rather than in patches tied to application technique, verify it isn't chalking or surface contamination instead, since those call for different remediation than dieback. If gloss loss is confirmed and widespread, strip to sound substrate and refinish rather than patching, and involve a lab if the same batch or formulation keeps failing across multiple jobs.
Reviewing surface roughness measurement basics helps explain why even a properly cured film can read as lower gloss once its microsurface texture changes.
Formulation-Level Causes: Dispersion, Dispersants, and Lab Diagnostics
When gloss loss shows up consistently across a production batch rather than tracing to one job's application error, the root cause usually sits upstream in the formulation. Insufficient dispersion stabilization allows pigment particles to flocculate during storage or transport, clumping together and roughening the film at a microscopic level even when the coating was applied correctly.
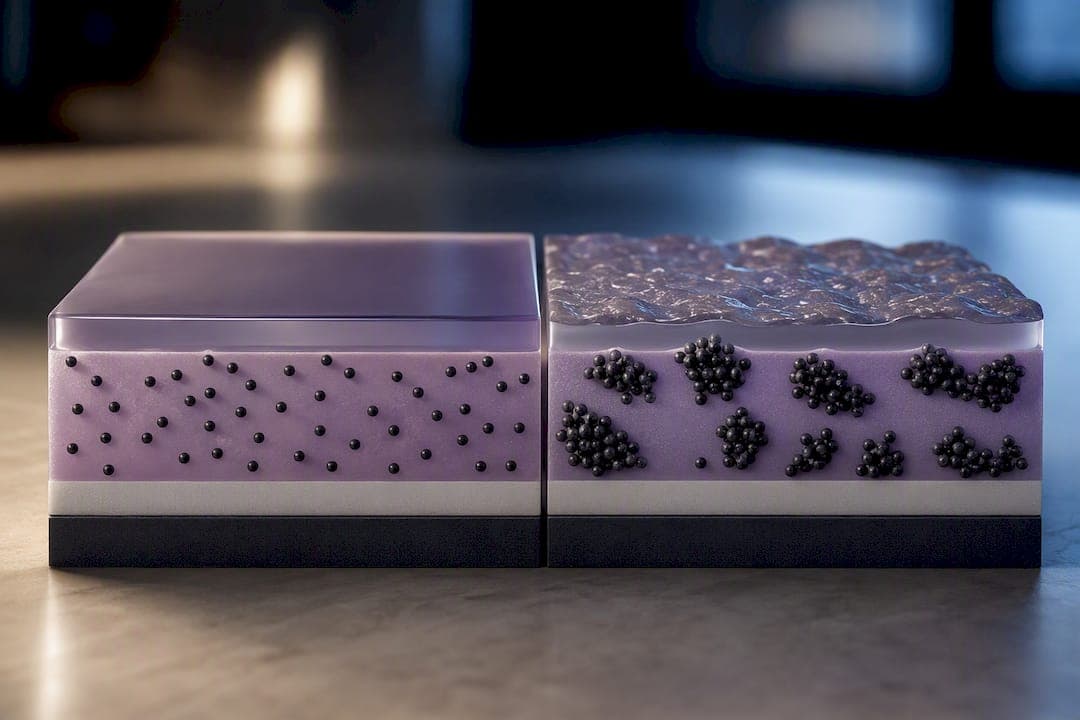
Dispersant loading is the lever formulators check first. Underloaded systems leave pigment surfaces only partially stabilized, while overloading can hurt other film properties, so dosage adjustments require controlled lab trials rather than guesswork.
Diagnostics worth running before blaming the application crew:
- Particle-size analysis (DLS or equivalent) to detect flocculation that visual inspection misses.
- Accelerated storage testing to see whether gloss degrades over simulated shelf time.
- Rheology profiling to catch instability tied to dispersant or resin interaction.
- Surface-profile measurement on cured panels to quantify roughness against a known-good reference batch.
Bring retained samples from both a good batch and a failing batch, along with formulation sheets and storage history, when consulting a technical supplier. That comparison narrows the search considerably faster than a single sample ever can. A closer look at dispersant selection and dosage walks through how these variables interact in practice.
An R&D Checklist for Diagnosing Gloss Failures
Three checks isolate root cause faster than any single test alone: confirm cure state and solvent activity first, compare a failing sample against a known-good reference under raking light, and run a quick particle-size check when the defect appears batch-wide rather than job-specific. The most common misdiagnosis is blaming application technique when the real issue is marginal pigment stabilization that only shows itself after weeks in a warehouse. Formulators who treat dispersant loading as a fixed recipe rather than a variable to test against each pigment lot tend to chase the same gloss complaint repeatedly without ever resolving it.
— Astra R&D Team
Solving Gloss Stability at the Formulation Level
Job-site fixes only go so far when the defect originates in the can, not the application. A specialist additive manufacturer provides formulation solutions to address stable gloss issues beyond application techniques.

The ASTRA DISP® dispersant line targets the pigment stabilization issues that cause flocculation and gloss drift during storage. ASTRA REO® rheology modifiers address film leveling problems that can masquerade as gloss loss, and the ASTRA DF® silicone defoamer range resolves surface disruption from entrained air that also flattens perceived sheen. Each product line is supported with dosage guidance and sample trials to assist formulators in optimizing dispersant loading without relying on trial and error. Browse the full product catalog and request a technical consultation with sample trials to get a batch-specific diagnosis instead of a generic recommendation.
Sources
- Solving coating gloss issues over time: Preventing loss of gloss
- Avoiding Dieback: Why Your Gloss Disappears After Painting
- Loss of Gloss or Dull Paint
- How to Fix Poor Gloss Retention Problems - Dulux Trade
FAQ
How Can I Fix Peeling or Gloss-Loss Paint?
Confirm the film has finished curing, then scuff-sand and recoat small isolated areas; for widespread peeling or dieback across a batch, strip to sound substrate before refinishing.
What Does Clear Coat Failure Look Like?
Clear coat failure typically shows as hazing, cracking, or delamination that develops days after application, often starting at edges or high-build areas where solvent takes longest to escape.
Can Gloss Paint Be Thinned?
Yes, using the reducer or thinner specified by the manufacturer for the ambient temperature and humidity; the wrong thinner or ratio is a common contributor to trapped-solvent dieback.
Which Is Better, Gloss or Matte?
Neither is universally better. Gloss depends on surface smoothness and offers easier cleaning while showing more surface imperfection, while low gloss and matte finishes hide texture flaws better but show less light reflection.
Is Gloss Loss the Same as Chalking?
No. Gloss loss from dieback usually stems from trapped solvent or curing reactions, while chalking is a different surface defect tied to binder breakdown, so confirm which one you're dealing with before choosing a repair method.
Recommended
Testing additives for this application?
Send us your current formulation challenge and our technical team will recommend an ASTRA product package for lab screening.