Fisheyes in Paint: Causes, Prevention, and Repair
Fisheyes in Paint: Causes, Prevention, and Repair ! Close-up of fisheye paint defects on metal panel Fisheyes in paint are small, circular craters that form in a wet film immediately after spraying, where surface contamination or a surface-tension imbalance has repelled the coating from the substrat…
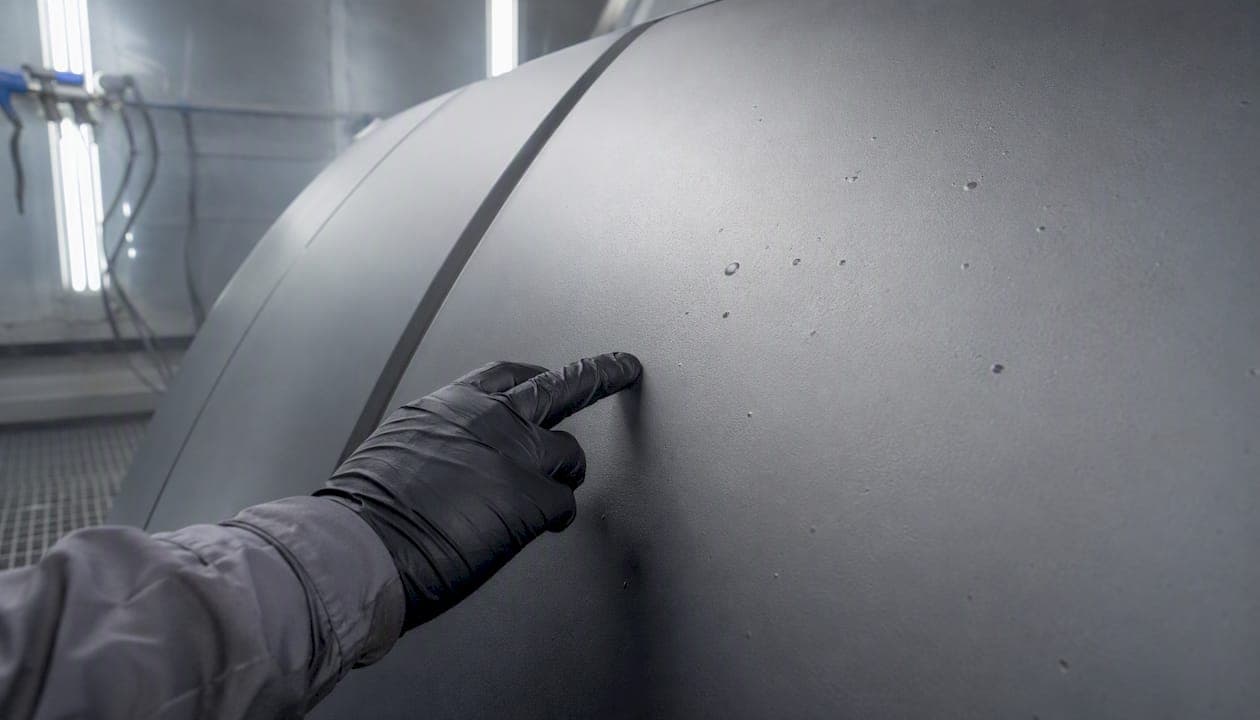
Fisheyes in paint are small, circular craters that form in a wet film immediately after spraying, where surface contamination or a surface-tension imbalance has repelled the coating from the substrate. When they appear, stop spraying the affected panel at once. Isolate the materials and equipment in use, and begin a focused surface inspection before applying any additional coating.
- Stop spraying immediately to prevent the defect from spreading across the panel.
- Isolate variables: set aside the current batch of reducer, thinner, and any recently opened materials for inspection.
- Inspect the substrate surface for silicone residue, oil transfer, wax, or grease using a clean, solvent-dampened wipe.
- Assess severity: small, isolated craters can sometimes be corrected in-place with a surface-tension modifier; widespread cratering across the panel typically requires sanding back to a sound surface and a full recoat.
Key Takeaways
Surface contamination and surface-tension imbalance are the root causes of fisheyes in paint, and no additive substitutes for verified-clean substrate preparation and a controlled air supply.
| Point | Details |
|---|---|
| Stop and isolate immediately | When fisheyes appear, stop spraying, isolate materials and equipment, and inspect the substrate before recoating. |
| Contamination sources are broad | Silicone polishes, compressor oil, bare-hand contact, and contaminated thinners are all confirmed fisheye vectors. |
| Eliminators assist, not replace, prep | Fisheye eliminators lower surface tension for marginal conditions but cannot overcome heavy silicone or grease contamination. |
| Severity determines repair depth | Minor isolated craters may respond to a mist coat with eliminator; widespread defects require sanding to a sound surface and full recoat. |
| Astra-chemical for formulation support | Astra-chemical supplies non-silicone defoamers, wetting agents, and surface-tension modifiers with sample programs and lab trial assistance. |
Fisheyes present as circular or annular depressions in the wet film, often with a slightly raised, glossy rim surrounding a lower center. In severe cases, the substrate or primer is visible at the crater bottom. Size ranges from very small spots to approximately typical small crater size in diameter, and distribution can be isolated or clustered depending on the contamination pattern. PPG's refinish technical guidance describes them as dimples or craters that form in the wet film immediately after spraying, a timing detail that distinguishes them from defects that develop during cure.
Quick visual checklist for field diagnosis:
- Wet film: craters appear within seconds of gun pass; rims are glossy and well-defined; film does not flow back to fill the depression.
- Cured film: depressions remain after drying; sanding reveals a distinct edge; the crater may not sand out cleanly if the contamination has bonded to the substrate.
- Distribution pattern: random isolated spots suggest localized contamination (hand contact, rag transfer); clustered or streaked patterns suggest air-supply or gun contamination.
- Rim character: a raised, glossy ring around a matte or substrate-visible center is the clearest indicator of a fisheye rather than a pinhole or solvent pop.
What causes fisheyes in paint?
The underlying mechanism is a surface-tension imbalance. Contaminants with very low surface energy, particularly silicone oils and hydrocarbon greases, create localized zones where the coating's surface tension is higher than that of the substrate. The wet film dewets from those zones, pulling back to form a crater. Sherwin-Williams technical guidance identifies oil, wax, and silicone as the primary contamination categories, and TD Paint's defect prevention guide extends that list to incompatible surface treatments and contaminated compressed air.
Common contamination sources:
- Silicone-based polishes, mold-release agents, or lubricants used in or near the spray area
- Polishing residues and wax left on the substrate after buffing
- Compressor oil carried through unfiltered air lines
- Contaminated thinners or reducers stored in improperly sealed containers
- Bare-hand contact with a prepped panel, transferring skin oils
- Dirty or silicone-contaminated spray rags and tack cloths
- Cross-contamination from mixing areas shared with silicone-containing products
Beyond contamination, process and formulation variables can amplify susceptibility. Poor flash-off between coats traps solvent and disrupts film formation. Wrong reducer selection for ambient temperature alters viscosity and flow. Cold material applied to a warm substrate creates a surface-tension gradient that mimics contamination-driven cratering. Two-component (2K) polyurethane and clearcoat systems are particularly sensitive because their crosslinked network begins forming quickly, leaving less time for the film to self-level over a contaminated zone.
Proven pre-spray steps that prevent fisheye defects
Prevention is the most cost-effective control. The following sequence reflects manufacturer-recommended practice and field-tested shop discipline.
- Degrease the substrate thoroughly using a wax and grease remover appropriate for the substrate type; wipe in one direction with clean, lint-free disposable cloths to avoid redepositing contamination.
- Use only silicone-free polishes and prep products in the spray environment; silicone-based compounds used anywhere in the shop can migrate as airborne particles and settle on prepped panels.
- Use clean, dedicated disposable wipes for each solvent wipe step; never reuse a rag that has contacted a polished or waxed surface.
- Wear clean nitrile gloves when handling prepped panels; skin oils transfer readily and are sufficient to trigger cratering in sensitive clearcoat formulations.
- Control booth airflow and filtration: replace intake and exhaust filters on schedule, and verify that air velocity is within the booth manufacturer's specification.
- Drain compressor moisture traps daily and inspect oil/water separators; install coalescing filtration upstream of the spray gun when the air supply has a history of contamination events.
- Store reducers and solvents in sealed, labeled containers away from silicone-containing products; use dedicated, clean mixing cups and strain all paints through a fine-mesh filter before loading the gun.
- Apply within the recommended temperature and humidity range for the coating system in use; most automotive refinish clearcoats specify substrate temperatures between 60°F and 80°F and relative humidity below 70%.
- Log every new chemical introduced to the shop, including cleaning products, lubricants, and polishes; fisheye outbreaks frequently correlate with a recent, seemingly unrelated product change.
Pro Tip: Keep a dedicated "silicone-free zone" in the prep area and post a visible sign. Even aerosol lubricants used on door hinges or equipment in an adjacent bay can introduce enough airborne silicone to trigger cratering on a freshly prepped panel.
How to fix fisheyes: severity-based repair options
Repair strategy depends on defect severity, the coating stage affected, and whether the film is still wet or has cured.
Step-by-step repair for moderate fisheye issues:
- Remove the wet film with a clean cloth dampened with the appropriate solvent; do not spread the contamination across the panel.
- Degrease the substrate with wax and grease remover; allow full flash-off before inspecting.
- Identify and eliminate the contamination source before respraying.
- Apply a test coat on a clean scrap panel to confirm the defect is resolved before committing to the production panel.
- Recoat using the manufacturer's recommended flash-off window between coats.
Auto Paint HQ's repair guide notes that minor fisheyes can sometimes respond to a controlled recoat with a fisheye eliminator added, while widespread defects require sanding to a sound surface and full reapplication. Sherwin-Williams recommends removing the wet paint film and thoroughly cleaning before refinishing when contamination is confirmed.
For clearcoat repairs, blend the recoated area into adjacent panels using a graduated mist coat sequence. Apply the first pass at reduced pressure and increased distance to lay a thin, tack coat; follow with full wet coats once the mist coat has flashed. This approach reveals whether fisheyes persist before a heavy coat locks in the defect.
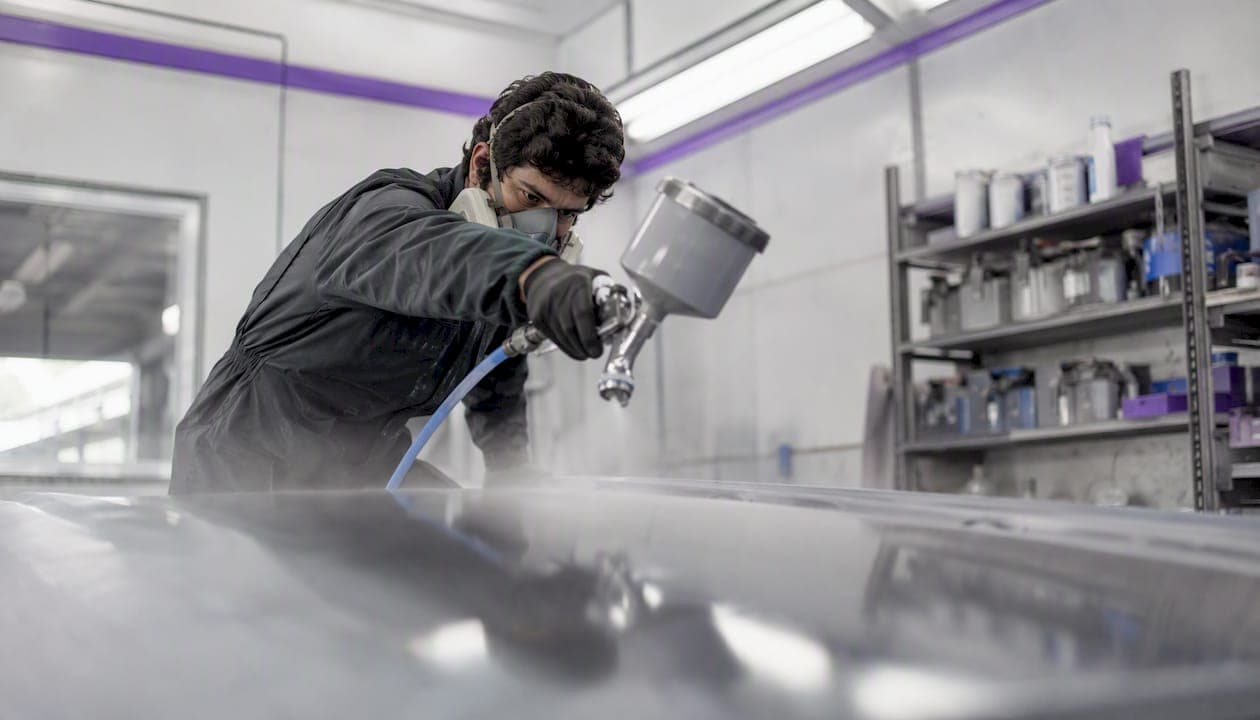
Pro Tip: At the clearcoat stage, apply one deliberate mist coat and wait 60–90 seconds. If craters reappear in the mist coat, the contamination is still present on the substrate. If the mist coat lies flat, proceed with full wet coats. This test saves a full sand-and-recoat cycle.
Fast diagnostic flow to find the root cause on the shop floor
When fisheyes appear, the following sequence isolates the contamination vector efficiently.
- Stop spraying and document the panel location, coating stage, and materials in use.
- Spray a clean test panel using the same gun, material, and air supply. If the test panel is clean, the substrate is the likely contamination source. If the test panel also shows craters, the gun, air supply, or material is suspect.
- Inspect the air supply: drain the moisture trap, check the coalescing filter, and run a compressed-air stream onto a clean white cloth. Oil staining or water droplets confirm air-supply contamination.
- Check recent chemical changes: review the shop change log for any new polish, lubricant, cleaner, or thinner introduced within the past two weeks.
- Test gun and hose cleanliness: flush the gun with clean solvent and spray onto a test panel. Persistent craters after flushing suggest contamination inside the hose or fluid passages.
- Perform a solvent wipe test on the substrate: wipe with a clean cloth dampened with wax and grease remover and inspect the cloth. Visible oily residue or a rainbow sheen confirms surface contamination.
Decision outcomes: a clean test panel with a contaminated substrate points to prep failure or post-prep contamination (handling, airborne silicone). Both panels failing points to the gun, hose, air supply, or material batch. A clean gun flush with a clean test panel but a contaminated substrate narrows the cause to surface prep or environmental deposition.
How do fisheyes differ from solvent pop, orange peel, and pinholes?
Misdiagnosis leads to the wrong repair, so distinguishing fisheyes from visually similar defects is a prerequisite for any corrective action.
- Fisheyes vs. solvent pop: fisheyes are contamination-driven craters that appear immediately after the gun pass; solvent pop results from trapped solvents or gases escaping through a partially cured film and produces small burst bubbles or pits that appear during or after flash-off. Eastwood's technical guide documents these as distinct defects requiring different fixes: cleaning and surface-tension control for fisheyes, and corrected application timing or reducer selection for solvent pop.
- Fisheyes vs. orange peel: orange peel produces a textured, dimpled surface that resembles citrus skin across the full panel; it results from insufficient atomization, incorrect gun distance, or fast-evaporating reducers. Orange peel is uniform and lacks the raised rim and substrate-visible center characteristic of a fisheye crater.
- Fisheyes vs. pinholes: pinholes are small, deep perforations that typically originate in the primer or filler layer and telegraph through the topcoat; they are narrower and deeper than fisheyes and do not have a glossy rim. Pinholes are associated with trapped air or solvent in thick film builds, not surface contamination.
Simple in-shop tests to confirm the defect type:
- Timing test: craters appearing within seconds of the gun pass are fisheyes; defects that develop 30–120 seconds after application during flash-off are more consistent with solvent pop.
- Solvent wipe test: wipe the affected area with a clean solvent cloth before the film cures; if the crater wipes out cleanly, solvent pop or flow-related issues are more likely; if the crater persists or the cloth shows oily residue, fisheye contamination is confirmed.
- Profile test: under raking light, a fisheye shows a raised rim around a depressed center; orange peel shows a uniform, undulating texture without discrete rims.
When to use fisheye eliminators and surface-tension modifiers
Fisheye eliminators are surface-tension modifiers, typically low-surface-energy silicone or fluorinated additives, that reduce the coating's surface tension to improve wet-out over marginally contaminated areas. They do not remove contaminants. As Auto Paint HQ explains, an eliminator allows the film to flow over minor residual contamination, but concentrated silicone deposits or heavy grease will overwhelm any additive at practical use levels.
UL Prospector's technical review documents that root-cause investigations for cratering and fisheyes can require microscopy, FTIR analysis, and full process review when the defect source is not immediately apparent from field inspection. Formulation chemists note that fisheye-resistant additives help the coating wet out under marginal conditions but cannot overcome severe, concentrated silicone residues.
Recommended approach for additive trials:
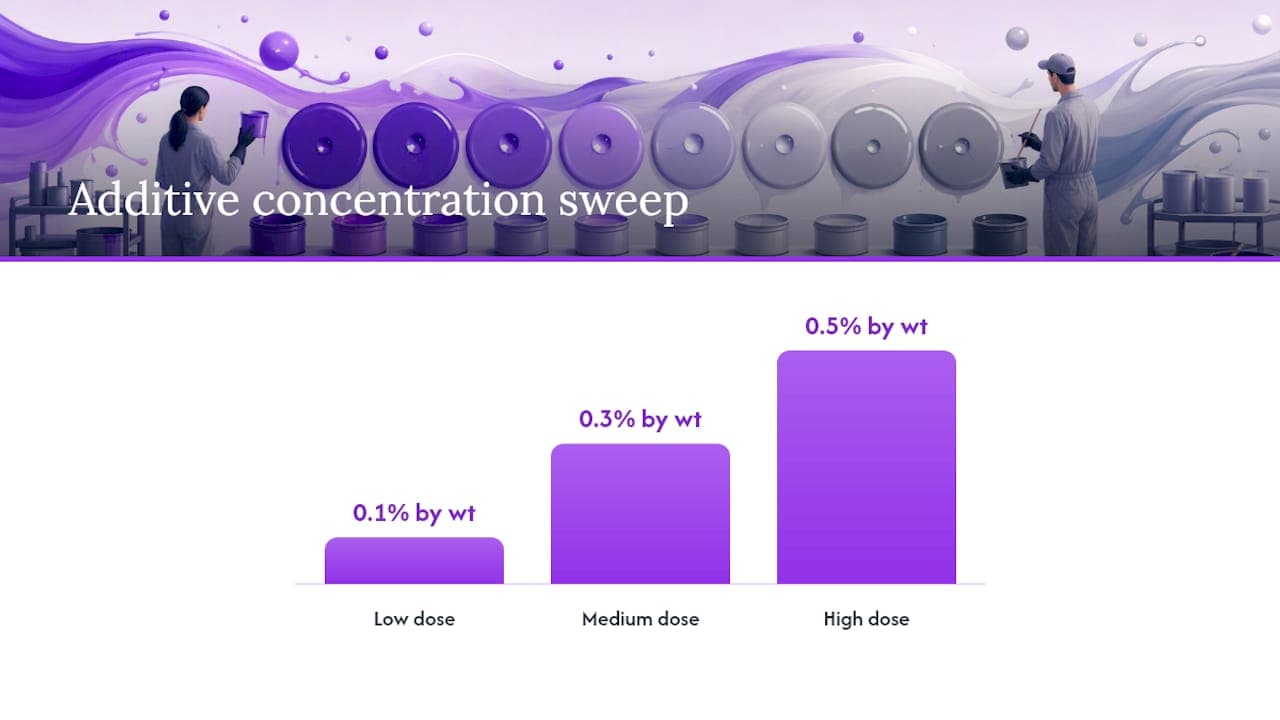
- Conduct small-batch laboratory trials before production deployment; prepare a concentration sweep (e.g., 0.1%, 0.3%, 0.5% by weight) and apply each concentration under the expected production conditions.
- Evaluate each concentration for fisheye resistance, gloss retention, intercoat adhesion, and any negative effects on film hardness or recoat window.
- Replicate the actual application environment: gun pressure, fluid tip size, substrate temperature, and flash-off timing should match production parameters.
- Do not add eliminators to undercoats or basecoat color layers without explicit supplier guidance; Sherwin-Williams field guidance notes that eliminator use is recommended for specific wet-film cases and should follow manufacturer protocols.
- Document process controls that must accompany additive use: consistent atomization pressure, controlled flash-off windows, and a verified-clean air supply. Additives used without these controls produce inconsistent results.
Pro Tip: Run a matrix trial that varies additive dose, reducer temperature, and atomization pressure simultaneously. This identifies the minimum effective dose and the process window within which the additive performs reliably, reducing the risk of over-addition, which can itself cause gloss or adhesion issues.
Consult an additive supplier when field trials are inconclusive or when the defect persists despite confirmed clean prep. Bring formulation data, application parameters, ambient conditions at the time of the defect, and photographs of the crater pattern. This information allows a technical chemist to distinguish between a formulation surface-tension problem and a process or environmental contamination issue.
A coatings professional's perspective on troubleshooting priorities
The most persistent mistake in fisheye troubleshooting is treating the defect as a cleaning failure and stopping the investigation there. Cleaning is necessary but not sufficient. Shops that track every chemical change, every new product introduced, and every equipment service event resolve fisheye outbreaks faster because they have a change log to interrogate rather than a blank slate.
The second underappreciated factor is the air supply. Compressor oil contamination is intermittent by nature: a filter that passed inspection last month may be saturated today, and the contamination appears only under certain humidity or temperature conditions. A compressed-air wipe test on a white cloth, performed at the start of every spray session, costs thirty seconds and eliminates the most common non-substrate contamination vector before it becomes a problem.
For complex or recurring defects that resist field repair, escalating to laboratory analysis, specifically FTIR spectroscopy to identify the contaminant chemistry and optical microscopy to characterize the crater morphology, is the correct path. UL Prospector's coating defects review confirms that defects may originate in the substrate, the coating, or the environment, and that process analysis is often required alongside chemical testing. Field repairs address symptoms; lab analysis identifies the root cause and prevents recurrence.
Astra-chemical's additive solutions for fisheye-sensitive formulations
Formulators and procurement teams working on fisheye-sensitive coating systems can request samples and technical consultation directly from Astra-chemical. The product range includes non-silicone defoamers for applications where silicone introduction must be eliminated at the formulation level, wetting agents and surface-tension modifiers for fisheye-resistant film formation, and dispersants that improve substrate wet-out in pigmented systems.
Astra-chemical's technical team supports sample programs, laboratory trial design, and formulation consulting for clients addressing persistent cratering or fisheye defects in production. For formulators evaluating additive candidates, the coating additives guide covers additive chemistry, selection criteria, and dosage frameworks across coating types. Contact Astra-chemical at Astra-chemical to request samples or schedule a technical consultation with a formulation chemist.
Sources
- Understanding Coating Defects: Identification, Root Cause Analysis, and Corrective Action in Industrial Coating Systems
- Paint Defects Prevention Guide | Knowledge Base
- How to Fix Paint Fisheye: Causes, Solutions & Eliminators – Auto Paint HQ
- How to Prevent and Fix Fisheyes or Solvent Pop in Paint Jobs — Eastwood
Recommended
- 7 Water-Based Coating Formulation Mistakes and How to Fix Them | ASTRA CHEMICAL
- Wetting Agents for Coatings: Silicone, Fluoro and Acetylenic Guide | ASTRA CHEMICAL
- Coating Additives Guide: Selection, Chemistry & Formulation (2026) | ASTRA CHEMICAL
- Blog — Coating Additives Insights & Technical Guides | ASTRA CHEMICAL
Testing additives for this application?
Send us your current formulation challenge and our technical team will recommend an ASTRA product package for lab screening.